When fitting a socket outlet or power point, a backing box or pattress is fixed in place to house the socket and the wiring connections behind. Back boxes for surface mounted socket outlets and those mounted flush in plasterboard are generally made of plastic. Pattresses for flush-mounted socket outlets in solid walls are generally made of metal.
Need a way to protect exposed wires and cables? A surface mounted box may be the solution you’re looking for. This guide will compare different surface mount boxes, their components, and how you may fit one yourself.
What is a Surface Mount Box?
When wire and in-wall box installation is not an option, get yourself a surface mount box. These boxes house wires and cables so you can safely protect and access them from the wall’s surface. There are a few types of surface mount boxes:
- Junction Boxes: Ideal for low-voltage cable lines
- Unloaded Surface Mount Boxes: Can hold different connection types
- Loaded Surface Mount Box: Comes preloaded with specified connections (depending on the brand)
The plastic boxes are usually white in colour. Popular specifications are 2 gang with a depth of 35mm. However, you can find them in a wide array of dimensions.
What is Surface Pattress?
A surface pattress, also known as a pattress box, wall box, or backing box, is installed on a wall’s surface. A pattress protects wires and electrical components from wear and tear. When installed correctly, a pattress forms a strong seal. Wall anchor plates keep it in place for as long as you need.
These boxes are usually made of metal. You can also embed a pattress inside the wall behind an outlet socket or light switch. When it is inside the wall, it is called a flush box. Flush boxes that are installed in plasterboard walls are made of plastic. If it is installed in a solid wall, it is made of metal.
Are Surface Mounted Sockets Safe?
Yes, surface mounted sockets are safe—and convenient. They allow electricians to access them without having to open up the wall. But you must install them properly!
How Do I Fit a Surface Mounted Socket?
Here, we will review how to install a plastic surface mounting box and insert the cable so you can connect it up to the socket outlet.
Tips
- Measure twice, cut once.
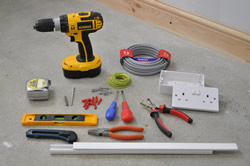
- Have the proper tools before you start.
- Turn the electricity off.
- Wear appropriate protective gear.
Prioritise your safety, especially when dealing with anything electrical.
In this guide we show you how to fix a plastic surface mounted back box and insert the cable Need More Info? ready for connecting up the socket outlet
Surface Mounted Socket Outlet
Mounting the box for a surface mounted socket outlet is reasonably straightforward.
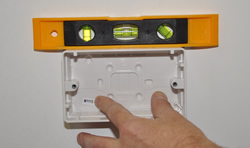
1. Hold the plastic box in position against the wall and, using a small spirit level Need More Info?, ensure that it is perfectly level.
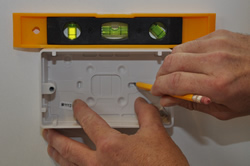
2. Mark the wall through two of the fixing holes in its base.

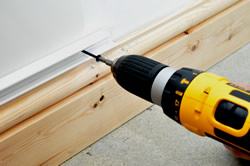
3. Double check that there are no services buried in the wall at this point then, using a masonry drill bit Need More Info?, drill a suitably sized hole for the wall plugs
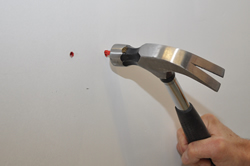
4. Insert the wall plugs Need More Info? and tap them home with a hammer
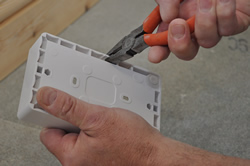
5. Determine which side of the box the cable will be coming in through and cut out the corresponding cable entry slot. Make sure this is left smooth so that it doesn’t cut into the cable. Use a small file to smooth it if needs be.
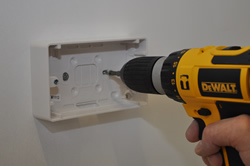
6. Position the box against the wall so that the fixing points align with the wall plugs fitted earlier. Insert the screws and fasten them with a cordless driver Need More Info? on a moderate torque setting.
7. Before running the cable to the socket, consider how and where this will be fixed.
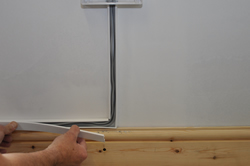
8. Wherever this is exposed it should be protected. The simplest and easiest way to protect the exposed cable is with mini trunking Need More Info?.
9. Measure each section of mini trunking required and cut to length.
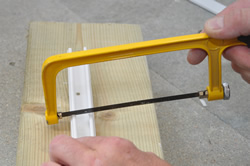
10. Mini trunking can be cut easily with a small hacksaw Need More Info?.
11. Remove the cover of the trunking and place to one side for use later. These covers simply pull off and snap back on.
12. Most mini trunking has a self adhesive strip on the back allowing it to simply be stuck in position. However, plugging and screwing it to the wall will make it far more secure.
13. Where the trunking needs to change direction, simply use right angled corner connectors.
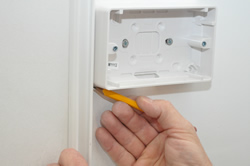
14. With the trunking securely fixed in position right up to the socket outlet cable entry point, the cable can now be laid inside it.
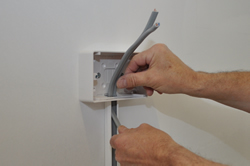
15. Feed the cable in through the entry point in the socket box.
16. Snap the mini trunking covers in place to hide and protect the cable.