Nails provide a fast, strong method of joining wood which does not need to be taken apart. Use this type of fixing in areas where the finish is covered, such as floorboards. They can also be used for garden features.
Strong nail joints
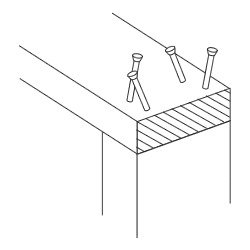
Make a strong nailed joint between pieces of timber or board by skewing the nails as you hammer them in. Hold the joint steady with a nail hammered in the normal way. Angle the other nails at about 25 degrees, in pairs and facing each other. This will stop them from pulling out easily.
Always wear goggles when using a hammer.
Using the right length of nail
To hold a thin piece of material to a thicker joist or framework, use a nail of a length at least three times the thickness of the thin piece.

Removing nails
Lever out old nails with a claw hammer. If the surface is to be visible, protect it with a scrap of wood under the hammerhead.
Choose the right hammer
Buy a good quality claw hammer for general work and a pin hammer for driving in smaller fixings. Check the weight and balance before you buy it. A claw hammer should be at least 16oz (450g), preferably 20oz (570g) with a comfortable rubber handle and steel shaft. Check the claw is tapered enough to fit under small nail heads easily.
Nails for floors
To stop floor boarding splitting, use rectangular section nails called cut floor brads. Nails with a spiral twist on the shank can also be used as they work like a screw and reduce the chance of loose squeaking boards. Blunt tips mean they are less likely to split the boards.
You will find that, by holding a nail upside down and giving it a couple of taps before turning it back the right way and driving it, it can prevent splitting. Not only does this blunt the tip, but the head of the nail will have punched a slight recess in the wood as well.
Nails for walls
Round shank nails made from hardened steel can be punched into brickwork or mortar to fix timbers directly to the wall ie skirting boards.
Take extra care with these as they can snap and fly with great force – remember, you should always wear safety goggles when using a hammer.
These masonry nails should always be struck square.
Panel pins
Choose these small nails for finer work such as fixing the back on a cabinet or making up a picture frame. The small heads are sunk just below the surface with a nail punch and the hole hidden with wood filler. Blunt the ends with a hammer to stop them from splitting thin moldings.
You will find that, by holding a pin upside down and giving it a couple of taps before turning it back the right way and driving it, it can prevent splitting. Not only does this blunt the tip, but the head of the pin will have punched a slight recess in the wood as well.
Nails for outside
Always choose galvanised nails for exterior work. They are zinc-coated and will not rust in damp conditions. Galvanised clout nails have over-sized heads to hold roofing felt securely.
General purpose joinery nails
For making up rough carcases, use round wire nails, available in sizes up to around 6in (150mm). You can also buy nails with rings on the shank that give a stronger fixing.